Microsoft has introduced a new drag-and-drop experience in Windows 11 builds 22635.4950 and 27818.1000. The feature adds a handy tray at the top of the screen, making it easier to drag a file and drop it directly into one of the supported apps shown there.
- How to Enable the New File Drag-and-Drop Feature on Windows 11
- Step 1: Download ViVeTool
- Step 2: Open ViVeTool in Command Prompt or Windows Terminal
- Step 3: Drag a File to the Top of the Screen
- Step 4: Drop the File Into an App
- How to Restore Drag-and-Drop Behavior in Windows 11 With a Utility
- Final Thoughts
At Geekinter, we like these small Windows quality-of-life upgrades because they often save more time than people expect, especially if you work with files all day. If you want to try this feature early, you can enable it with ViVeTool or use a third-party utility that brings back a more familiar drag-and-drop experience.
Here’s how to turn it on.

How to Enable the New File Drag-and-Drop Feature on Windows 11
Step 1: Download ViVeTool
First, download ViVeTool to your PC using the guide below:
How to Use ViVeTool to Enable Hidden Features in Windows
Step 2: Open ViVeTool in Command Prompt or Windows Terminal
Once you have ViVeTool ready, open it in Command Prompt or Windows Terminal.
Then run the following command:
vivetool /enable /id:45624564,53397005After that, restart your computer.
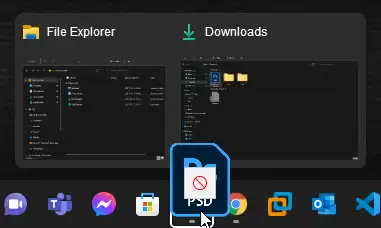
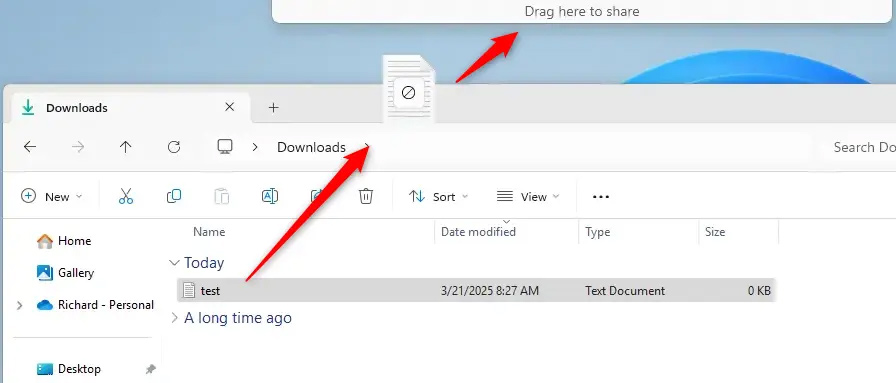
Step 3: Drag a File to the Top of the Screen
Once your PC reboots, you can start using the new sharing tray.
To do this, drag a file from File Explorer or from your desktop toward the top of the screen. This should trigger the new sharing tray to appear.
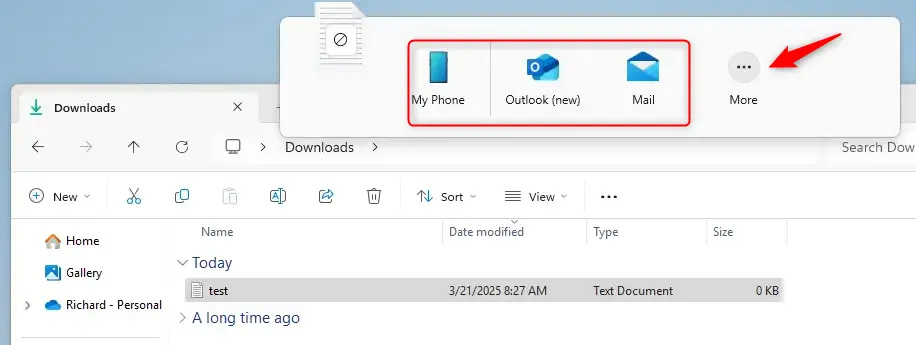
Step 4: Drop the File Into an App
When the tray appears, choose one of the apps shown to share the file.
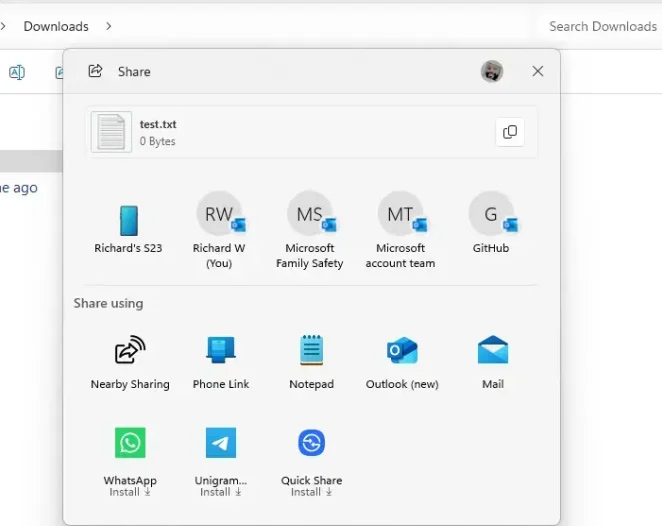
If you want to see more available apps, click More to expand the list.
The new drag-and-drop tray appears at the top of the screen whenever you drag a local file from File Explorer or the desktop. It is a small change, but for users who regularly move files between apps, it can make the workflow feel much smoother.
How to Restore Drag-and-Drop Behavior in Windows 11 With a Utility
If you would rather bring back a drag-and-drop experience that feels more like Windows 10, there is another option.
Step 1: Download the Tool From GitHub
Go to GitHub and download Windows 11 Drag And Drop To Taskbar Partial Fix, a tool created by a developer who goes by HerMajestyDrMona.
Download Windows11DragAndDropToTaskbarPartialFix
Step 2: Download the Executable File
Click Windows11DragAndDropToTaskbarPartialFix.exe to download the executable file.
Step 3: Run the Tool
Double-click the Windows11DragAndDropToTaskbarPartialFix.exe file you just downloaded to launch the utility.
Once it is running, you should be able to perform drag-and-drop actions in a way that feels much closer to Windows 10.
This tool works by automatically detecting whether you are holding down the left mouse button and whether you are dragging a file onto the Windows 11 taskbar. If it detects that action, it simulates the Win + Ctrl + Number keyboard shortcut, allowing you to drag and drop files from one app to another more easily.
Final Thoughts
Microsoft is clearly still refining the Windows 11 file-sharing experience, and this new drag-and-drop tray is a good example of that. It is simple, practical, and useful for everyday multitasking.
That said, if you still miss the more familiar taskbar drag-and-drop workflow from older Windows versions, the third-party workaround may be the better fit for now.
At Geekinter, we always keep an eye on these kinds of Windows features because they may look minor on paper, but in real-world use, they can make daily computing a lot more efficient.


'%3e%3cg id='Final-Copy-2_2_' transform='translate(1275.000000, 200.000000)'%3e%3cpath class='st0' d='M7.4,12.8h6.8l3.1-11.6H7.4C4.2,1.2,1.6,3.8,1.6,7S4.2,12.8,7.4,12.8z'/%3e%3c/g%3e%3c/g%3e%3c/g%3e%3cg id='final---dec.11-2020'%3e%3cg id='_x30_208-our-toggle' transform='translate(-1275.000000, -200.000000)'%3e%3cg id='Final-Copy-2' transform='translate(1275.000000, 200.000000)'%3e%3cpath class='st1' d='M22.6,0H7.4c-3.9,0-7,3.1-7,7s3.1,7,7,7h15.2c3.9,0,7-3.1,7-7S26.4,0,22.6,0z M1.6,7c0-3.2,2.6-5.8,5.8-5.8 h9.9l-3.1,11.6H7.4C4.2,12.8,1.6,10.2,1.6,7z'/%3e%3cpath id='x' class='st2' d='M24.6,4c0.2,0.2,0.2,0.6,0,0.8l0,0L22.5,7l2.2,2.2c0.2,0.2,0.2,0.6,0,0.8c-0.2,0.2-0.6,0.2-0.8,0 l0,0l-2.2-2.2L19.5,10c-0.2,0.2-0.6,0.2-0.8,0c-0.2-0.2-0.2-0.6,0-0.8l0,0L20.8,7l-2.2-2.2c-0.2-0.2-0.2-0.6,0-0.8 c0.2-0.2,0.6-0.2,0.8,0l0,0l2.2,2.2L23.8,4C24,3.8,24.4,3.8,24.6,4z'/%3e%3cpath id='y' class='st3' d='M12.7,4.1c0.2,0.2,0.3,0.6,0.1,0.8l0,0L8.6,9.8C8.5,9.9,8.4,10,8.3,10c-0.2,0.1-0.5,0.1-0.7-0.1l0,0 L5.4,7.7c-0.2-0.2-0.2-0.6,0-0.8c0.2-0.2,0.6-0.2,0.8,0l0,0L8,8.6l3.8-4.5C12,3.9,12.4,3.9,12.7,4.1z'/%3e%3c/g%3e%3c/g%3e%3c/g%3e%3c/g%3e%3c/svg%3e)

0 comments